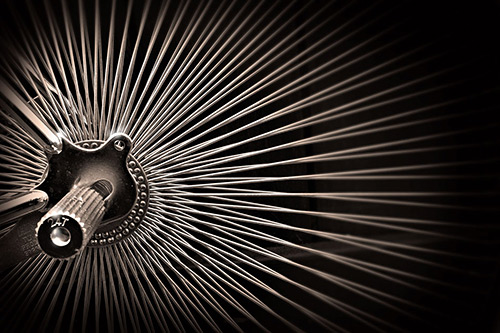
We are going to explore Abstract Photography. It is really challenging to make something that is so acurately representaional to be non-representational. First define abstract photography. Then look into photographers who have revolutionized the medium of non-representational photography. Aaron Siskind, Karl Blossfeldt, and Imogen Cunningham. You can also find your own inspiration there are many contemporary photographers who work with abstraction check out the Museum of Contemporary Photography and Jane Fulton. Put some of the found abstract images in your journal. Other abstract photographers: Mark Raymond, Tara Gill.
Then you are going to consider something about yourself to abstract. You are to take at least 5 different compositions of various aspects of you in an abstract way. You can physically be the subject, or it can be something that represents you, but in an abstract way. So dig deep and consider who you are, interests, personality, likes/dislikes, loves, passions, pros and cons... your identity...?
You should also consider using the studio and perhaps try manipulating the depth of field. Think technical and compositional. Eventhough your images are going to be abstract, make sure there is some visual integrity to your images.
I am attaching a tutorial of how to get up close to your subject. I think this may be a help:
quick video 4, extreme macro photography trick from Jim Talkington on Vimeo.
Thursday, December 20, 2012
Monday, December 3, 2012
November Photo Diary
Photo 11 November
You should have an example of each of the following plus a contact sheet (saved to the share folder)
Photo 12 November
You should have an example of each of the following plus a contact sheet (saved to the share folder)
- Aperture/Macro
- White Balance
- Painting with Light
- Random Roll
- Theatrical Portrait Ideas
- 5 points about Photographers plus an image by them
- 5 Images by your chosen photographer
- Random Roll
Monday, October 1, 2012
September PhotoDiary
If you are keeping a book/ journal, you do not need to have a blog/digital journal as well. They are one and the same.
Here's what you need:
- Title page with a photo with your name and grade.
- A great photo- your definition of a great photo.
- 1 best from Ft. Squared.
- 1 best from Goat Farm
- 1 random roll-contact and one of your best with a comment, title, reflection
You can add anything that sparks your interest too, and you do not have to limit your journal entries to my # requirements.
Monday, September 24, 2012
Double Exposure Collaboration Project
Check out what we did last time. The LFAS Anonymous Phototgraphy Collaboration Project
Cool idea, not double exposure, but interesting Anonymous Photography Project.
For the Double Exposure Collaboration Project, you are going to photograph on one roll of 36 exposure black and white film, then put the film in an envelope and pull out some one else's roll and shoot on that one so it will be double exposed.
In class we decided on specific themes to photograph. Start with simple lines, and textures. Everyone should start by finding visual ideas for each shoot. The new students were shown how to load and use the SLR cameras, but some will need some help to get started.
Finish roll one and put your film in the envelope. Try to leave the tab out when you rewind the film.
Thursday, September 13, 2012
Creating a Contact Sheet
We are going to learn how to use Adobe Bridge to select, rename and organize your photos into a contact sheet. Bridge has many functions such as batch rename and other utilities to help with organization, and supports editing of digital images in Camera Raw format. Organizational features include assigning colored labels or star ratings to images. And can recognize a variety of file types. Here is a tutorial to clarify: http://youtu.be/6m9nBwiskAQ you only need to watch the first 2:20 mins. Don't change the spacing and keep "file name" turned on.
- Open Adobe Bridge
- Open the file that holds your Emphasis/Rules photo.
- Right click RENAME the photos by the emphasis technique you used.
- CTRL click on the photos using the same emphasis technique
- Select "OUTPUT" under the top tool bar.
- Go to the Output window on the right of your screen (sometimes it will take a minute to appear).
- Select PDF instead of WEB GALLERY.
- Under the TEMPLATE option, select CONTACT SHEET (4*5=20 photos or 5*7=35 photos)
- Scroll to the very bottom of the Output window to where it says SAVE.
- Before you press save, check the "VIEW PDF AFTER SAVE"
- Once the PDF opens, FILE>SAVE AS>
- Type the assignment name i.e "My LFAS2 Contact Sheet" or "Emphasis Contact".
- SAVE AS TYPE: Select "JPG"
- Make sure you select where you are going to save it to.
- Then press SAVE.
- Post to your blog as you would post an image.
Monday, September 10, 2012
Signing in to the LFAS computer Network
We are going to sign in to the LFAS computer network.
Your login is your BCESIS# (student # on timetable). ie. 1234567
Your password is the 1st 2 letters of your 1st name (lower cased) ie. do (for donna)
plus the 1st 4 numbers of your BCESIS # ie. 1234
and 2 dollar signs ie. $$
the whole thing will look like this:
LOGIN: 1234567
PASWORD: do1234$$
To change your password you must vist the school district web site:
http://www.sd35.bc.ca/passwords
sign in with your current login and password, then
OLD PASSWORD: ******** (leave this alone)
NEW PASSWORD: must be at least 8 characters with 3 different types of characters ie. ddDD33##, but don't use backslashes or forward slashes//\\.
CONFIRM NEW PASSWORD: type in your new password again.
Tuesday, June 12, 2012
Monday, June 11, 2012
Invisible Bicycles
We are going to start the "A Case for Levitation" project today. Here is a fun spin on it:
http://www.toxel.com/inspiration/2012/05/28/invisible-bicycles/
Monday, May 28, 2012
New Ideas...
Alex Buono- cool things happening with cameras.
Christopher Scheneberger Photoshop Un-reality and 3-D photography.
Tuesday, May 22, 2012
Photo12s- Portfolio
Presentation of an Exemplary Portfolio(20 marks)
(2.5 marks each image, total 30 marks)
Design a simple online portfolio with 12 + of your best images. 50 possible marks
With the above criteria
Select only your very best images: composition, technical, creativitiy.
Consider the flow, order, and
- Introduction/artists statement (5 marks): Paragraph 1 introduces self and explains interest in photography, Paragraph 2 describes nature of your work (make references to specific pieces), Paragraph 3 Your future how might you further your imterests in photography.
- Well organized (5 marks)- good flow from image to image- strong beginning and end.
- Professional presentation (5 marks)- no technical flaws.
- Overall portfolio (5 marks)
(2.5 marks each image, total 30 marks)
- Clear concept/message
- Composition & design
- Technical Proficiency
- Creative treatment of subject matter
- Professional quality
Design a simple online portfolio with 12 + of your best images. 50 possible marks
With the above criteria
Select only your very best images: composition, technical, creativitiy.
Consider the flow, order, and
Monday, May 21, 2012
Thursday, May 10, 2012
Nature Verses- CHRISTO & JeanClaude
Internationally acclaimed artists Christo and Jeanne-Claude spent more than 40 years creating highly celebrated works of art around the world. Together this unique, dynamic married couple changed the concept of “public art” by creating temporary works that are truly transitory by design.
Christo and Jeanne-Claude have never accepted, nor will Christo accept in the future, any subsidies, royalties, grants, or sponsorships of any kind for their temporary public works of art. Similarly, the artists do not make any endorsements of businesses, products, political movements, other artists, or anything else. All of the artists’ income is derived from the sale of original works of art by Christo to private collectors, galleries and museums. Christo and Jeanne-Claude have always maintained a position of total artistic freedom, with no constraints or financial considerations imposed upon their works of art by any outside party.
Over the River Project Site- August of 2015
Over The River is a two-week temporary work of art by the artists Christo and Jeanne-Claude. The project’s plans call for 5.9 miles of silvery, luminous fabric panels to be suspended high above the Arkansas River along a 42-mile stretch of the river between Salida and Cañon City in south-central Colorado. Fabric panels will be suspended at eight distinct areas of the river that were selected by the artists for their aesthetic merits and technical viability.
Overview of Christo's & Jean-Claude's work
Find examples of Christo and Jean Claude's work to add to your journal
Nature Verses Research Assignment
Research your Nature Verses project. Select at least one source to inspire and educate your project.
Take notes while you watch/read, and collect information for your project planning. Site the title and author of your research, describe what the document is about and what perspective the author takes on the issue, then note how it has influenced your project.
Due May 18th.
Film/Documentaries-
Dirt
No Impact Man
The Earthling (WARNING-real life horror film super scary!)
The Cove
Scared Sacred
Fierce Light
One Ocean (2 episodes)
FOOD Inc.
Our Daily Bread (warning- real life horror film)
Forks Over Knives
Force of Nature- Dr. David Suzuki
HOME by Yann Arthus Bertrand
Baraka
Koyaanisqatsi
Manufactured Landscapes
Inconvenient Truth- Al Gore
The Unforeseen
Sharkwater
Who Killed the Electric Car
Processed People
TED talks/short videos
Edward Burtynski- Photographer of industrial spaces
Phil Borges- Photographer
Wade Davis- National Geographic Explorer on Endangered Cultures
Mark Bittman- Cookbook Author-What is wrong with what we eat?
Jeremy Jackson- How we wrecked the ocean
Captain Charles Moore- Plastic in the ocean
Mike deGruy- Filming Octopus
Sylvia Earle- Protect Our Oceans
Dianna Cohen- Plastic Pollution Coalition
Chris Jordan- Photographer of Excess
Shai Agassi- Electric cars
John Robbins Part 1&2 Why I went vegetarian & What's wrong with eating animals
The Story of Stuff- Problems in Consuming
Story of Bottled Water
Story of Cosmetics
Story of Electronics
Articles/Publications
No Impact Man -Blog
Mother Earth News
The Guardian Environment
Vancouver Sun- Sharks
Globe and Mail- Biodiversity Conference
Globe and Mail- Price of Nature
NY Times- Environment Section
National Geographic
OnEarth
Emagazine
The Walrus- The Last Great Water Fight
Books
Silent Spring- Rachel Carson
Our Common Future
Manufactured Consent- Noam Chompsky
Diet for a New America- John Robbins
Walden, or Life in the Woods- Henry David Thoreau
Ishmael- Daniel Quinn
Animal, Vegetable, Mineral- Barbara Kingsolver
Take notes while you watch/read, and collect information for your project planning. Site the title and author of your research, describe what the document is about and what perspective the author takes on the issue, then note how it has influenced your project.
Due May 18th.
Film/Documentaries-
Dirt
No Impact Man
The Earthling (WARNING-real life horror film super scary!)
The Cove
Scared Sacred
Fierce Light
One Ocean (2 episodes)
FOOD Inc.
Our Daily Bread (warning- real life horror film)
Forks Over Knives
Force of Nature- Dr. David Suzuki
HOME by Yann Arthus Bertrand
Baraka
Koyaanisqatsi
Manufactured Landscapes
Inconvenient Truth- Al Gore
The Unforeseen
Sharkwater
Who Killed the Electric Car
Processed People
TED talks/short videos
Edward Burtynski- Photographer of industrial spaces
Phil Borges- Photographer
Wade Davis- National Geographic Explorer on Endangered Cultures
Mark Bittman- Cookbook Author-What is wrong with what we eat?
Jeremy Jackson- How we wrecked the ocean
Captain Charles Moore- Plastic in the ocean
Mike deGruy- Filming Octopus
Sylvia Earle- Protect Our Oceans
Dianna Cohen- Plastic Pollution Coalition
Chris Jordan- Photographer of Excess
Shai Agassi- Electric cars
John Robbins Part 1&2 Why I went vegetarian & What's wrong with eating animals
The Story of Stuff- Problems in Consuming
Story of Bottled Water
Story of Cosmetics
Story of Electronics
Articles/Publications
No Impact Man -Blog
Mother Earth News
The Guardian Environment
Vancouver Sun- Sharks
Globe and Mail- Biodiversity Conference
Globe and Mail- Price of Nature
NY Times- Environment Section
National Geographic
OnEarth
Emagazine
The Walrus- The Last Great Water Fight
Silent Spring- Rachel Carson
Our Common Future
Manufactured Consent- Noam Chompsky
Diet for a New America- John Robbins
Walden, or Life in the Woods- Henry David Thoreau
Ishmael- Daniel Quinn
Animal, Vegetable, Mineral- Barbara Kingsolver
Loading...
The World Without Us- Alan Weisman
The Omnivore's Dilemma: A Natural History of Four Meals- Michael Pollan
No Impact Man, The adventures of a guilty liberal who attempts to save the planet- Colin Bevan
Last Child in the Woods: Saving our children from Nature-Deficit Disorder- Richard Louv
Added to my books! add my re
Monday, May 7, 2012
Saturday, May 5, 2012
Nature Verses- ANDY GOLDSWORTHY
Andy Goldsworthy |
Andy Goldsworthy River & Tides1
Andy Goldsworthy River & Tides2
Rivers & Tides 3
Rivers & Tides4
Find examples of Andy Goldsworthy's work to add to your journal.
Nature Verses- Project Outline
Nature Verses is an exhibition showcasing the
work of LFAS Photography students. The exhibition will consist of mini installations
that respond to the environment. The great outdoors will be the venue (LFAS Court
Yard).
The project questions and
challenges the relationship between humans and nature. It’s the Canadian
conundrum; the fine balance of peoples’ continuous struggles with the beauty,
and the power of the environment. Students will respond to the works of
Andy Goldsworthy, and Christo & Jean-Claude, and various other installation artists. The
exhibition will be on-going for two weeks; nature may prevail and destroy the
works; this harsh reality becomes part of the experience. Once the exhibition
ends, there will be no evidence of its existence.
Materials & Construction Consider the following
materials: fabric, photographs, paper, wood, rope, string, plastics, and metals.
Bring all materials to create the installation and remove
them when the exhibition is over. Students will not be permitted to alter or
destroy anything on the school grounds.
Project Outline
Students are required to create a
detailed plan in which they outline a proposal for an art installation in the school
grounds. The installation will be in response to the environment and the chosen display area. When planning, consider renowned
environmental installation artists: Andy Goldsworthy and Christo & Jean-Claude. Parents and friends are encouraged to participate.
Evaluation
The students will be marked on
creativity, originality, successful implementation of their plan. The students’
artwork will express a clear message relating to the theme “Nature Verses”. The
installation is respectful of the surrounding environment. The complete clean
up of their installation area. Students will only receive a final grade when
all evidence of the installation has been removed.
Monday, April 23, 2012
12 InfraRed Photography
- Keep infrared film cold.
- Load infrared film in complete darkness.
- Use a filter when shooting infrared film.
- Photograph in early or late day light, never at night, or mid-day.
- Choose landscapes, live things for your subject.
- Consider the sky- dramatic clouds look amazing.
- People look creepy- pale, eyes are black and veins are pronounced.
In infrared photography, the film or image sensor used is sensitive to infrared light. The part of the spectrum used is referred to as near-infrared to distinguish it from far-infrared, which is the domain of thermal imaging. Wavelengths used for photography range from about 700 nanometre to about 900 nm. Film is usually sensitive to visible light too, so an infrared-passing filter is used; this lets infrared (IR) light pass through to the camera, but blocks all or most of the visible light spectrum (the filter thus looks black or deep red). ("Infrared filter" may refer either to such a filter or to one that blocks infrared but passes other wavelengths.)
When IR filters are used together with infrared-sensitive film or sensors, very interesting "in-camera effects" can be obtained; false-color or black-and-white images with a dreamlike or sometimes lurid effect mainly caused by foliage (such as tree leaves and grass) strongly reflecting in the same way visible light is reflected from snow. There is a small contribution from chlorophyll fluorescence, but this is marginal and is not the real cause of the brightness seen in infrared photographs
This is a BW Infrared project, but you are welcome to try digital infrared, but it seems that you need specialized/adapted camera equipment.
Here is an Infrared Photography site to check out: http://www.infraredphoto.eu/Site/GentleIntro1.html
Tuesday, April 3, 2012
12- Zone System Analysis
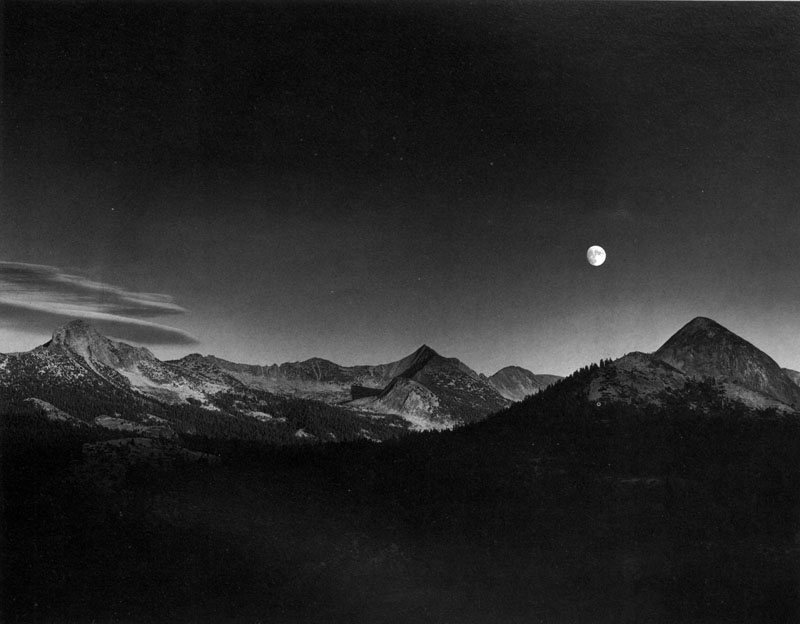
Choose one of the Ansel Adam's Landscape photos and identify the zones. You should have at least one of each of the zones: I, II, III, IV, V, VI, VII, VIII, IX, there likely will not be zones O or X. You can either save the image and indentify this in Photoshop, or on Word... Illustrator... then post to your Journal.
Monday, April 2, 2012
12 Zone System
Your camera’s metering modes are built to give you a correct reading under most average situations. But when you’re faced with an exceptional situation, your camera’s metering can easily be fooled, thinking a scene is brighter or darker than it actually is. This is where knowledge of the zone system can save you a lot of trouble, and help you capture not only correct but also intriguing exposures every time.
Although calculations for the zone system were originally based on black and white sheet film, the Zone System is also applicable to roll film, both black and white and color, negative and reversal, and even to digital photography.
The Zone System’s Key Concepts
The zone system divides a scene into 10 zones on the tonal scale (though there are variations of 9 and 11 zones). Every tonal range is assigned a zone. Every zone differs from the one before it by 1 stop, and from the one following it by 1 stop. So every zone change equals 1 stop difference. Zones are identified by roman numbers, with the middle tone (with 18% reflectance) being a zone V which is zone 5.
Photographers, usually are only concerned with zones III through VII (zones 3 through 7). The darkest part of a scene would fall into zone III, while the brightest part of a scene would fall into zone VII. Anything darker than zone III would render as pure black with no detail (under-exposed), while anything brighter than zone VII would render as pure white with no detail (over-exposed).
If you point your camera at an area with average reflectance and obtain the correct meter readings (a zero on the light meter), that area would be rendered as average. If you open up your lens or slow down your shutter speed by one stop, that area will become over-exposed by one stop. If you close down your lens or increase your shutter speed by one stop, that area will become under-exposed by one stop.
An average tone is naturally placed into zone V. If you over-expose it by one stop, you’ll be placing it in zone VI (zone 6), causing it to render brighter than it actually is. If you under-expose it by one stop, you’ll be placing it in zone IV (zone 4) causing it to render darker than it actually is.
--------------------------------------------------------------------------------
The Zone System is a photographic technique for determining optimal film exposure and development, formulated by Ansel Adams and Fred Archer in 1939–1940. The technique is based on the late 19th century sensitometry studies of Hurter and Driffield. The Zone System provides photographers with a systematic method of precisely defining the relationship between the way they visualize the photographic subject and the final results.
0-I-II-III-IV-V-VI-VII-VIII-IX
Zone Scale
0 Pure black
I Near black, with slight tonality but no texture
II Textured black; the darkest part of the image in which slight detail is recorded
III Average dark materials and low values showing adequate texture
IV Average dark foliage, dark stone, or landscape shadows
V Middle gray: clear north sky; dark skin, average weathered wood
VI Average Caucasian skin; light stone; shadows on snow in sunlit landscapes
VII Very light skin; shadows in snow with acute side lighting
VIII Lightest tone with texture: textured snow
IX Slight tone without texture; glaring snow
X Pure white: light sources and specular reflections
The zone system divides a scene into 10 zones on the tonal scale (though there are variations of 9 and 11 zones). Every tonal range is assigned a zone. Every zone differs from the one before it by 1 stop, and from the one following it by 1 stop. So every zone change equals 1 stop difference. Zones are identified by roman numbers, with the middle tone (with 18% reflectance) being a zone V which is zone 5.
Photographers, usually are only concerned with zones III through VII (zones 3 through 7). The darkest part of a scene would fall into zone III, while the brightest part of a scene would fall into zone VII. Anything darker than zone III would render as pure black with no detail (under-exposed), while anything brighter than zone VII would render as pure white with no detail (over-exposed).
If you point your camera at an area with average reflectance and obtain the correct meter readings (a zero on the light meter), that area would be rendered as average. If you open up your lens or slow down your shutter speed by one stop, that area will become over-exposed by one stop. If you close down your lens or increase your shutter speed by one stop, that area will become under-exposed by one stop.
An average tone is naturally placed into zone V. If you over-expose it by one stop, you’ll be placing it in zone VI (zone 6), causing it to render brighter than it actually is. If you under-expose it by one stop, you’ll be placing it in zone IV (zone 4) causing it to render darker than it actually is.
--------------------------------------------------------------------------------
0 Pure black
The relationship between the physical scene and the print is established by characteristics of the negative and the print. Exposure and development of the negative are usually determined so that a properly exposed negative will yield an acceptable print on a specific photographic paper.
The Assignment
- First- find an image by Ansel Adams an identify all of the zones.
- Then you are to go out with a grey card and a roll of Black & White Film and take portraits and landscape photos around the area. Take an overall reading from your light meter in your camera and take that photo.
- Then point your camera at a middle grey card set your exposure to that setting and then take the photo of your scene. Note if there is a difference in exposure.
- Bracket your photos at least one up and one down for each photo.
- Print a contact sheet and one 5 x 7 evenly exposed and contrasted print.
Tuesday, February 7, 2012
11/12 Random Rolls
For many of you, this is a chance to catch up on Random Rolls. For others, this is a chance to get ahead. Here are a few suggestions of Random Rolls to try:
- Short depth of field and dead flowers (some of you still need to do your "APERTURE" Random Roll).
- New growth, shapes and textures
- Slow shutter
- Portraits and landscapes long depth of field.
- Make ugly look beauitful
- Ant's eye view
- Explore colours, shapes and lines of the new tennis court.
- Colour Balance- Remember this one? Some have forgot to do it...
- Take a whole random roll on "M" make adjustments to imporve.
Monday, February 6, 2012
Random Rolls
Hi Folks, while I am home sick, I want you to take advantage of this beautiful day and take some photos. Make sure you take 20+ photos and print a contact sheet by the end of class and hand it in by the end of class.
Option #1
Sunny Day Photos, a few things to try: shoot into the light, look for shadows, try over exposing a little, add a fill flash to a portrait, play with white balance, experiment with depth of field, and horizon line...
Option #2
Grade 12s start your Abstract Self-Portrait project with a random roll today go out with a camera and photograph objects, your challenge is to make simple everyday items look interesting.
Grade 11s work to develop your Book project ideas both with examples from the internet post to your journal and with a random roll.
Thursday, February 2, 2012
Abstract Self-Portrait/Studio Still-Life
This is a 2 part project. First we are going to learn about lighting objects in the studio. Then you are going to use the different lighting effects to creatively and stylistically light objects that represent something about you.
Studio Still Life
You are to create three studio still life compositions using metal, glass and textured objects. Compose a series of photos for each object; include backgrounds, a table and covering, and use one or two lights. Here is the Still Life Project Criteria
Abstract Self-Portrait
Create 5 interesting, creative, and eye catching images that represent something about you. This is sort of a photo essay of yourself except the images are going to be abstract photographs of objects that represent aspects about you. When you abstract things photographically, you don’t have to make it completely unrecognizable; though you should choose an attribute of that object and really explore it through the lens. Your compositions challenge the viewer to notice basic essence of objects.
Look for elements of design (shape and colour) and use the principles of design to help you compose the items that you choose to represent you.
Abstract Self-Portrait Criteria
Monday, January 9, 2012
Photoshop Tutorials
Try the three Following tutorials using one of your B/W portraits from the InsideOut Project and post your image to your blog BP (before Photoshop) and AP (After Photoshop).
Basic Photoshop Touch-Ups
Photoshop Sketch Effect
Selective Colouring an Image
Find a Photoshop portrait tutorial that you are interested in trying. Work through the tutorial to see if you like it and then post your image to your blog and before and after Photoshop. Critique the tutorial.
Basic Photoshop Touch-Ups
Photoshop Sketch Effect
Selective Colouring an Image
Find a Photoshop portrait tutorial that you are interested in trying. Work through the tutorial to see if you like it and then post your image to your blog and before and after Photoshop. Critique the tutorial.
Tuesday, January 3, 2012
Picture of the Year 2011
Find your 3 favourite photos from the following sites:
Top 2011 News Stories
New Years 2012 from Around the World
Christmas Images Around the World
Top 2011 News Stories from Reuters
Here's what you do:
Top 2011 News Stories
New Years 2012 from Around the World
Christmas Images Around the World
Top 2011 News Stories from Reuters
Here's what you do:
- Select your 3 favourite "news" photo from 2011, msnbc.com, Reuters, and the NewYears fom msnbc.
- Upload to blog.
- Answer the questions below for all three.
- Comment why it is your favourite.
- Explain what the event is. What is the significance of the event/photo?
- Describe the photos, how does the image document the event/ how does the image tell the story?
- Identify the main subject and what emphasizes it. (Leading lines, repetition, rule of thirds, contrast, framing).
Subscribe to:
Posts (Atom)