Tuesday, November 19, 2013

Aperture & Depth of Field


Depth of Field Site
Digital Photo School
iStock Photo
Define the following, put in your journal:
  1. List Standard Aperture/F-stops from brightest exposure to darkest-
  2. Aperture Priority-
  3. Ambient Light-
  4. Artificial Light-
  5. ASA/ISO/Film Speed-
  6. Bracket-
  7. Depth of Field-
  8. Exposure Triangle-
  9. How to Control Depth of Field-
  10. Light Meter- 
Find examples for your journal label each image and guess the aperture settings used on the camera.
Short, Medium, Long Depth of Field.

Let's try these together...


Monday, November 18, 2013

Micro, Macro & Close-up

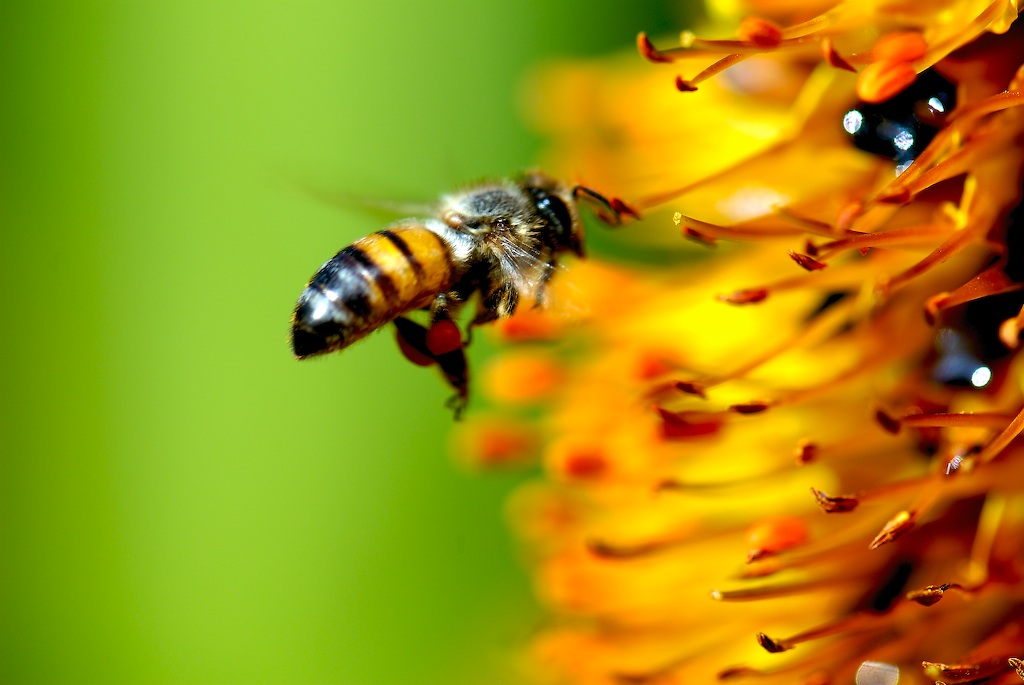
The word macro means big, whereas the word micro mean small. So how is it that these two terms related? If the subject you are photographing is small and you want to make it look big, you end up with a “macro” view of a “micro” subject.


What is macro (micro) photography?
Macro photography is that which is taken with a dedicated macro lens. A real macro lens has the capability of achieving in the least a 1:1 magnification. Just because a camera has the word macro written on it, doesn’t make it a true macro lens. Both the Nikon and Canon lenses mentioned above, are considered real macro lenses. If you’re not sure how to recognise a real macro lens, you may find an earlier article useful called, What is a real macro lens.

What is close up photography?
Close up photography, is the act of photographing objects such as flowers or insects in close range so the subject you are photographing fills the frame. In other words, it’s the act of photographing subjects close up. This is easily achievable with any lens, even a 300mm telephoto lens.
Macro photography is in essence close up photography as well. However, close up photography is not always considered as true macro photography. For example, if you have a lens that is NOT considered a real macro lens, yet offers a macro setting (as many do nowadays), this is usually refered to as being close up photography, and not true macro.

Monday, November 4, 2013

Histograms

A histogram is a simple graph that displays where all of the brightness levels contained in the scene are found, from the darkest to the brightest. These values are arrayed across the bottom of the graph from left (darkest) to right (brightest). The vertical axis (the height of points on the graph) shows how much of the image is found at any particular brightness level. Possibly the most useful tool available in digital photography is the histogram. It could also well be the least understood. In this article we will look at what a camera histogram tells the photographer and how best to utilize that information.

Virtually every digital camera, from the simplest point-and-shoot to the most sophisticated digital SLR has the ability to display a histogram directly, or more usually superimposed upon the image just taken.

This histogram shows an almost perfect distribution of tones covering about a 4 stop dynamic range — from deep shadows on the left to just short of bright highlights on the right. This fits comfortably within the approximately 5 stop dynamic range capability of most digital imaging chips.
A light meter reading tells you what exposure will render a standard 18% gray reference card as a mid tone. This reading may have been made because the camera read a variety of areas of the scene and averaged them out, or because you read the highlights, the shadows and some other areas and decided that a particular setting would yield the best compromise exposure for that scene.
This setting, like every other that you or your automated camera makes, is a compromise. In most real world situations there is no such thing as an ideal or “perfect” exposure. There is simply one that places the tonal values found in the scene most appropriately within the capability range of the camera’s imaging chip. And "most appropriately" means that the mid-tones found in the image fall roughly half way between the darkest and the brightest values. Hold that thought while we digress for a moment and look at the concept of dynamic range.

if a part of the image receives too much light it becomes burned out, and if too little light it is rendered as black. A recognizable image is only recorded if the light hitting the chip falls within a range of about 5 F stops. (Remember — each F stop is a doubling or halving of the amount of light hitting the film). With digital things are much the same and even the dynamic range is about the same as for slide film; about 5 stops. Also keep in mind that the total range of brightness values encountered in the real world is only about 10 stops — from the dimmest light that you can read in to the brightest beach or snow scene in which you might find yourself).

Histograms

Making a Contact Sheet


We are going to learn how to use Adobe Bridge to select, rename and organize your photos into a contact sheet. Bridge has many functions such as batch rename and other utilities to help with organization, and supports editing of digital images in Camera Raw format. Organizational features include assigning colored labels or star ratings to images. And can recognize a variety of file types. Here is a tutorial to clarify: http://youtu.be/6m9nBwiskAQ you only need to watch the first 2:20 mins. Don't change the spacing and keep "file name" turned on.
  1. Open Adobe Bridge
  2. Open the file that holds your Emphasis/Rules photo.
  3. Right click RENAME the photos by the emphasis technique you used.
  4. CTRL click on the photos using the same emphasis technique
  5. Select "OUTPUT" under the top tool bar.

  6. Go to the Output window on the right of your screen (sometimes it will take a minute to appear).
  7. Select PDF instead of WEB GALLERY.
  8. Under the TEMPLATE option, select CONTACT SHEET (4*5=20 photos or 5*7=35 photos)
  9. Scroll to the very bottom of the Output window to where it says SAVE.
  10. Before you press save, check the "VIEW PDF AFTER SAVE"
  11. Once the PDF opens, FILE>SAVE AS>
  12. Type the assignment name i.e "My LFAS2 Contact Sheet" or "Emphasis Contact".
  13. SAVE AS TYPE: Select "JPG"
  14. Make sure you select where you are going to save it to.
  15. Then press SAVE.
  16. Post to your blog as you would post an image.