Monday, December 5, 2011
Tuesday, November 8, 2011
Inside Out Reflection
Written Responses for each 8 x 10
Describe the person in the photo: Who are they? What is their mood? Is their “Art” obvious? If so, what is their art? If not, explain why not? How does this represent LFAS?
Overall InsideOut Reflection
Describe your journey through LFAS Inside Out Project and address two or more of the following reflection topics:
1. How challenging was it to represent LFAS?
2. What challenges did you face to connect with individuals to give their photographs personality?
3. How hard or easy was it to show the art of your model?
4. What sort of technical challenges did you have? Explain
5. What did you learn about yourself from this project?
6. What did you learn about people from this project?
7. What did you learn about photography from this project?
8. How important is it to you to have “your” photo on the LFAS wall and why?
9. Do you think that you are, or would like to be a “portrait” photographer? Why or why not.
10. Think of a topic of your own.
Wednesday, October 26, 2011
Inside Out Portraits Check List
InsideOut Project Criteria
Journal: Collect 5 JR portrait images, reflect on his work, and how LFAS can be represented.
PhotoDiary: Put one of your best images from each of your 2 shoots.
Scan: 1 negative from each of your three shoots and save it to the shared folder.
Vote/Spread the Word: The InSideOut Project will be available to view online at http://lfasinsideout.blogspot.com/ .We are going to select the final mural images based on LFAS votes.
Model Release: In order for your portrait to be presented on the LFAS wall, you must have model and parent consent.
JR#1: Portraits of LFAS Friends
You will take a series of portraits of one person using the specific portrait “formula” that the class created. To individualize your portrait, explore a variety of expressions, positioning, and maybe some props.
• Print a contact sheet and one 8 x 10 image.
• Scan your best negative, save to share file.
• Paste one photo in your PhotoDiary.
• Answer the following questions in your PhotoDiary: Describe the person in the photo: Who are they? What is their mood? Is their “Art” obvious? If so, what is their art? If not, explain why not? How does this represent LFAS?
JR#2: Portraits of an LFAS Elementary Student
Same as above, just photograph someone different this time.
Monday, October 3, 2011
LFAS- Inside Out Project
- The models can either hold something that relates to their art, or not.
- Models should wear a similar outfit (simple white t-shirt).
- Models should be expressive with body language.
- The portrait expressions should be expressive of their art, enthusiastic, fun, and candid.
- The models should be framed from the waist up.
- The portraits will be cut out when presented on the wall, but make sure the background is simple when you photograph them.
- The lighting should be even, from the front, minimal shadows.

Thursday, September 29, 2011
Thursday, September 15, 2011
JR Portraits
InsideOut Project
JR's Site
JR on TED talks
Go check out the work of Jr and photos related to his project. Select your favourite and post it to your blog/journal.
Answer the following Questions:
JR's Site
JR on TED talks
Go check out the work of Jr and photos related to his project. Select your favourite and post it to your blog/journal.
Answer the following Questions:
- Why did you choose this/why do you like it?
- What sort of message is it communicating?
- Can the style/format work for the LFAS JR project? Why or why not?
- What sort of ideas do you have for the JR LFAS project?
Monday, September 12, 2011
1st Portraits
Today we are going to take simple portraits of your class-mates and interview each other. After your interview and portrait session, you are to download your portrait to your file, re-name it by the name of the person in the photo and then save the best (one each) to the "SHARE" folder. Make a new folder in your personal space and call it "PHOTO" save all of your Photography class work there. Then we are going to share the portraits with the class. Remember your interview questions:
- Name,
- Major,
- Something you did during the summer,
- Your 1st photo memory.
Tuesday, September 6, 2011
Welcome to Photography
Arts Matter at LFAS. This year, you will notice some extra energy around the arts with the Arts Matter lecture series where artists from all across Canada will share experience and ideas and why the "Arts Matter" to them. We are going to start the year with an "Arts Matter" Portrait project to communicate why the Arts matter to us. Then we are going to take photos of fellow classmates to practice and communicate why the Arts Matter to them. And then we are going to go further to explore the LFAS community and why the Arts Matter to us.
JR's Project Site
JR on TED talks
InsideOut Project
JR's Project Site
JR on TED talks
InsideOut Project
Thursday, June 9, 2011
11 & 12 Photo Diary/Journal Criteria
Photo 11 Photo Diary Criteria
Photo 12 Photo Diary Criteria
Your Photo Journals are due on Tuesday, June 14th.
Photo 12 Photo Diary Criteria
Your Photo Journals are due on Tuesday, June 14th.
Thursday, June 2, 2011
Monday, May 30, 2011


12 Zone System
Your camera’s metering modes are built to give you a correct reading under most average situations. But when you’re faced with an exceptional situation, your camera’s metering can easily be fooled, thinking a scene is brighter or darker than it actually is. This is where knowledge of the zone system can save you a lot of trouble, and help you capture not only correct but also intriguing exposures every time.
Although calculations for the zone system were originally based on black and white sheet film, the Zone System is also applicable to roll film, both black and white and color, negative and reversal, and even to digital photography.
The Zone System’s Key Concepts
The zone system divides a scene into 10 zones on the tonal scale (though there are variations of 9 and 11 zones). Every tonal range is assigned a zone. Every zone differs from the one before it by 1 stop, and from the one following it by 1 stop. So every zone change equals 1 stop difference. Zones are identified by roman numbers, with the middle tone (with 18% reflectance) being a zone V which is zone 5.
Photographers, usually are only concerned with zones III through VII (zones 3 through 7). The darkest part of a scene would fall into zone III, while the brightest part of a scene would fall into zone VII. Anything darker than zone III would render as pure black with no detail (under-exposed), while anything brighter than zone VII would render as pure white with no detail (over-exposed).
If you point your camera at an area with average reflectance and obtain the correct meter readings (a zero on the light meter), that area would be rendered as average. If you open up your lens or slow down your shutter speed by one stop, that area will become over-exposed by one stop. If you close down your lens or increase your shutter speed by one stop, that area will become under-exposed by one stop.
Now, we’ve agreed that an average tone is naturally placed into zone V. If you over-expose it by one stop, you’ll be placing it in zone VI (zone 6), causing it to render brighter than it actually is. If you under-expose it by one stop, you’ll be placing it in zone IV (zone 4) causing it to render darker than it actually is.
--------------------------------------------------------------------------------
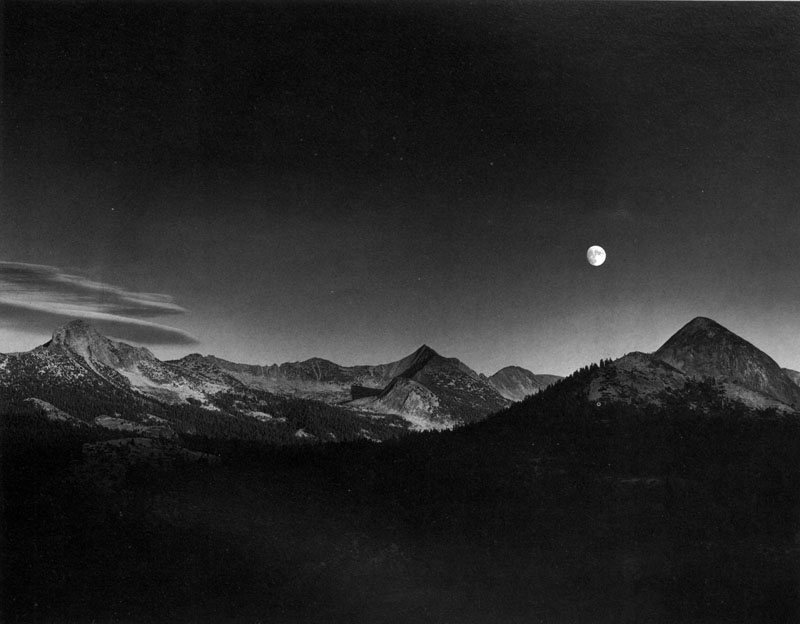
The Zone System is a photographic technique for determining optimal film exposure and development, formulated by Ansel Adams and Fred Archer in 1939–1940. The technique is based on the late 19th century sensitometry studies of Hurter and Driffield. The Zone System provides photographers with a systematic method of precisely defining the relationship between the way they visualize the photographic subject and the final results.
0-I-II-III-IV-V-VI-VII-VIII-IX
Zone Scale
0 Pure black
I Near black, with slight tonality but no texture
II Textured black; the darkest part of the image in which slight detail is recorded
III Average dark materials and low values showing adequate texture
IV Average dark foliage, dark stone, or landscape shadows
V Middle gray: clear north sky; dark skin, average weathered wood
VI Average Caucasian skin; light stone; shadows on snow in sunlit landscapes
VII Very light skin; shadows in snow with acute side lighting
VIII Lightest tone with texture: textured snow
IX Slight tone without texture; glaring snow
X Pure white: light sources and specular reflections
The relationship between the physical scene and the print is established by characteristics of the negative and the print. Exposure and development of the negative are usually determined so that a properly exposed negative will yield an acceptable print on a specific photographic paper.
Although calculations for the zone system were originally based on black and white sheet film, the Zone System is also applicable to roll film, both black and white and color, negative and reversal, and even to digital photography.
The Zone System’s Key Concepts
The zone system divides a scene into 10 zones on the tonal scale (though there are variations of 9 and 11 zones). Every tonal range is assigned a zone. Every zone differs from the one before it by 1 stop, and from the one following it by 1 stop. So every zone change equals 1 stop difference. Zones are identified by roman numbers, with the middle tone (with 18% reflectance) being a zone V which is zone 5.
Photographers, usually are only concerned with zones III through VII (zones 3 through 7). The darkest part of a scene would fall into zone III, while the brightest part of a scene would fall into zone VII. Anything darker than zone III would render as pure black with no detail (under-exposed), while anything brighter than zone VII would render as pure white with no detail (over-exposed).
If you point your camera at an area with average reflectance and obtain the correct meter readings (a zero on the light meter), that area would be rendered as average. If you open up your lens or slow down your shutter speed by one stop, that area will become over-exposed by one stop. If you close down your lens or increase your shutter speed by one stop, that area will become under-exposed by one stop.
Now, we’ve agreed that an average tone is naturally placed into zone V. If you over-expose it by one stop, you’ll be placing it in zone VI (zone 6), causing it to render brighter than it actually is. If you under-expose it by one stop, you’ll be placing it in zone IV (zone 4) causing it to render darker than it actually is.
--------------------------------------------------------------------------------
The Zone System is a photographic technique for determining optimal film exposure and development, formulated by Ansel Adams and Fred Archer in 1939–1940. The technique is based on the late 19th century sensitometry studies of Hurter and Driffield. The Zone System provides photographers with a systematic method of precisely defining the relationship between the way they visualize the photographic subject and the final results.
0-I-II-III-IV-V-VI-VII-VIII-IX
Zone Scale
0 Pure black
I Near black, with slight tonality but no texture
II Textured black; the darkest part of the image in which slight detail is recorded
III Average dark materials and low values showing adequate texture
IV Average dark foliage, dark stone, or landscape shadows
V Middle gray: clear north sky; dark skin, average weathered wood
VI Average Caucasian skin; light stone; shadows on snow in sunlit landscapes
VII Very light skin; shadows in snow with acute side lighting
VIII Lightest tone with texture: textured snow
IX Slight tone without texture; glaring snow
X Pure white: light sources and specular reflections
The relationship between the physical scene and the print is established by characteristics of the negative and the print. Exposure and development of the negative are usually determined so that a properly exposed negative will yield an acceptable print on a specific photographic paper.
Thursday, May 26, 2011

Thursday, May 12, 2011
11 CD Cover Colour Project


Elements of Design:
Line, Shape, Form, Texture
You are going to take a series of high contrast B/W photos for a CD cover. The music is up to you- could be a remake of an already existing CD for your favourite band, or a CD cover for an independent band, or for an imaginary band. Your images should be distinctly inspired by a musical genre or style of music. Your series will be photographed with black & white film, but printed monochromatically using the colour printer. Each of your images should include at least one of the Elements of Design: lines, shapes, texture, form, colour (but hard to do in BW film, that will happen in the darkroom).
Colour Darkroom:
Print a BW contact sheet, make sure you have included all of the elements of design. Then print four 5 x 5 prints. They are square to fit the proportions of a CD cover, so consider the format when you are shooting, you will have to crop off part of your photo. You are to print your photos on colour paper with the colour processor. You are to use colour filters to create mono-chromatic (one colour) colour. Try four out of six colours of the colour wheel. Remember that the colour on the enlarger will make the opposite effect on your print. Adding a yellow filter creates a purple print.

Journal:
Elements of Design- Find one photo for each element of design line, shape, texture, form.
or
Principles of Design- rhythm, repetition, balance, contrast, pattern, movement.
Colour Wheel of Photos- Organize a series of photos in a sequence relating to the colour wheel. see left.
Select your music and plan out how you are going to represent it visually.
Tuesday, May 3, 2011
The Story of Stuff
We brought up the notion of sustainability in class, I thought we should explore the concept some more:
The Story of Stuff
The Test Tube with David Suzuki
The Story of Stuff
The Test Tube with David Suzuki
Monday, May 2, 2011
Thursday, April 14, 2011
Define LFAS/Why Art Matters
Post a comment below, or visit my event on facebook:
http://www.facebook.com/event.php?eid=184367654942852&pending
We are looking forward to your response. Share with your friends and family.
http://www.facebook.com/event.php?eid=184367654942852&pending
We are looking forward to your response. Share with your friends and family.
12s Wrecking Film
Alternative Film Developing Processes
Some other techniques-
 |
| Expired Film |
 |
| Reticulation |
 |
| Cross Processing |
- Dip or Spaghetti Film Developing
- Homemade Developer ie. Caffinol
- Chrome w/ BW
- Red
- Pin Hole
Thursday, March 17, 2011
JR- InsideOut Project
JR, a semi-anonymous French street artist, uses his camera to show the world its true face, by pasting photos of the human face across massive canvases. At TED2011, he makes his audacious TED Prize wish: to use art to turn the world inside out. Learn more about his work and learn how you can join in at insideoutproject.net.
http://www.jr-art.net/
http://voicethread.com/#q.b1844847.i9705039
Part C
Now consider and discuss the following in your journal and with the class:
http://www.jr-art.net/
Part A
Choose one of the following topics from JR’s InsideOutside Project. Find an image from the series that you are noting and add the photo(s) and your comment in your journal/blog:- What was the initial intention of JR’s first installation project? Was it effective? Why or why not? Give examples of his work and explain its impact on the community.
- Select an image, or series that impacted you, explain how it has impacted you and the community that it was created for.
- How does JR’s art make a difference? Site a specific series and specific images. Explain the reason for the images and potential impact that it has on the community.
Part B
Visit voicethread, sign in, choose one of the photos and commenthttp://voicethread.com/#q.b1844847.i9705039
Part C
Now consider and discuss the following in your journal and with the class:
- Define your school community.
- What do you value about your school community?
- If it were threatened, how would you stand up for it?
- Based on your answers to #1, 2, 3 how could you best communicate your high school experiences?
Monday, March 14, 2011
Photoshop Comic Portrait

We are going to take a portrait and turn it in to a vector image to give it a cartoon like appearance. Start with a digital portrait, open it in Photoshop and follow along. When you are done, we are going to pull it into Comic Life and add a quote, song lyric, or poem...
Here are a few tutorials:
- In-Class Simple Vector Drawing Tutorial
- Easy Comic Tutorial
- Vector Drawing Tutorial (using the pen tool to create lines)
- Vector Tutorial (super fast overview of vector drawing)
http://www.wallwisher.com/wall/hope-for-Japan
Thursday, February 24, 2011
Cross-Processing Colour Film

Visit this cool site for some alternative photography techniques.
- Try some different types of film, and compare the characteristics of each.
- Try pushing or pulling your film.
- Try over or under exposing your film.
- Combine X-Pro with other techniques: multi-exposures, 35mm, filters and flashes.
- Get a load of expired film to use in your X-Pro experiments: expired film tends to be much cheaper than in date film.
Studio- Low Key/High Key Lighting

Low-key lighting is a style of lighting for photography, film or television. It is a necessary element in creating a chiaroscuro effect. Traditional photographic lighting, three-point lighting uses a key light, a fill light, and a back light for illumination. Low-key lighting often uses only one key light, optionally controlled with a fill light or a simple reflector.
Low key light accentuates the contours of an object by throwing areas into shade while a fill light or reflector may illuminate the shadow areas to control contrast. The relative strength of key-to-fill, known as the lighting ratio, can be measured using a light meter. Low key lighting has a higher lighting ratio, e.g. 8:1, than high key lighting, which can approach 1:1.
The term "low key" is used in cinematography to refer to any scene with a high lighting ratio, especially if there is a predominance of shadowy areas. It tends to heighten the sense of alienation felt by the viewer, hence is commonly used in film noir and horror genres.
Low-Key Tutorial 1
Low-Key Tutorial 2
High-Key Lighting

In the 1950s and 1960s, high-key lighting was achieved through multiple light sources lighting a scene—usually using three fixtures per person (left, right, and central) —which resulted in a uniform lighting pattern with very little modeling. Nowadays, multiple hot light sources are substituted by much more efficient fluorescent soft lights which provide a similar effect.
High-Key Lighting Tutorial
Project Criteria
Tuesday, February 15, 2011
11 Darkroom FX
 |
| Man Ray |
Here are the ones that I showed you how to do in class~
- Photogram- Place objects on top of your paper before you print to block out the light so that a silhouette of the object is left on your print. Print one with only the objects as the image, and print another with a negative in the enlarger. Design it so that the shapes work with the image and it creates a strong composition.
- Dodge and Burn- Block out an area on your print that is too dark, or expose another area that is too light for longer.
- Double Print- Either sandwich your negatives, or print the same one twice on the same sheet, or use two different ones and dodge an area, print two images on one sheet of paper.
- Contact Negative- Make a print in negative. Place one print faced down on top of un-exposed paper (works best in a contact holder), expose the light through the print, develop it, and volia.
- Solarizing- This is when you print a contact negative and then expose it to light part way through the developing stage.
- Vignette
- Spray on Developer or Fix
- Curve Paper
- Textured Screen
- Oober High Contrast
- Painting Chemicals
- Embossing
- Posterization
- Experiment...
DON'T FORGET TO KEEP A DARKROOM LOG!
Marking Criteria5 Experiments- 3.5 x 5 The prints will be marked for creativity, composition, success of the darkroom effect. You can try the ones I showed you in class, or other experiements as long as you have 5 total.
Monday, January 31, 2011
1/2 Year in Review
Select your favourite photo from this year so far.
- Why is this your favourite?
- Where is it from- does it have sentimental meaning for your- Explain.
- What would you title it?
- What is your favourite assignment- Why
- What is your least favourite assignment- Why?
- If you could, what would you change with the Photography Elective course?
- What photography style, technique, camera, film etc. do you want to try?
Tuesday, January 18, 2011
12s Journal Term 2
12s Journal
(Random Roll Contact Sheets 25-35 images based on a theme)
(Random Roll Contact Sheets 25-35 images based on a theme)
- Nov- Random Roll + best image in journal
- Dec- Random Roll + best image in journal
- Jan- Random Roll + best image in journal
- 5 Photographers Found Inspiration Images and 5 points about them
- Your best Photographer Image
- Aperture/Depth of Field Definitions
- 2010 Year in Photos and comments x 2
- Abstract Photography Examples
- 5 PhotoJournalists
11s Journal Term 2
Grade 11s Journal Check List
(Random Roll Contact Sheets 25-35 images based on a theme)
(Random Roll Contact Sheets 25-35 images based on a theme)
- Nov- Random Roll + best image in journal
- Dec- Random Roll + best image in journal
- Jan- Random Roll + best image in journal
- Painting with Light 5 Found Inspiration Images
- Painting with Light contact sheet and best print in journal
- Aperture Definitions
- Macro/Depth of Field 5 Found Inspiration Images
- Macro/Depth of Field contact sheet and best print in journal
- 2010 Year in Photos and comments x 2
- 5 Theatrical Studio Portait Ideas- Found Inspiration Images
Monday, January 3, 2011
This Year in Pictures
It is the beginning of a New Year. We're going to reflect on events that happened throughout 2010 that were where documented with photographs. We are going to take a look at the MSNBC photos of the year together as a class.
View the photos from either site (or both sites)
http://www.msnbc.msn.com/id/4999736/
or
http://uk.reuters.com/news/pictures/slideshow?articleId=USRTXVJJH#a=1
Here's what you do:
http://www.msnbc.msn.com/id/4999736/
or
http://uk.reuters.com/news/pictures/slideshow?articleId=USRTXVJJH#a=1
- Select your favourite "news" photo from 2010.
- Print or upload to journal/blog.
- Comment why it is your favourite.
- Explain what the event is.
- How does the image document the event? How does the image tell the story?
- Identify the subject?
- What emphasizes the subject and how does it emphasize it? Leading lines, repetition, rule of thirds, contrast, framing?
- Select your favourite NewYear's Photo.
- Print or upload to journal/blog.
- Comment why it is your favourite.
- Explain what the event is.
- How does the image document the event? How does the image tell the story?
- Identify the subject?
- What emphasizes the subject? Leading lines, repetition, rule of thirds, contrast, framing?
Subscribe to:
Posts (Atom)