Saturday, May 5, 2012

Nature Verses- Project Outline

Nature Verses is an exhibition showcasing the work of LFAS Photography students. The exhibition will consist of mini installations that respond to the environment. The great outdoors will be the venue (LFAS Court Yard).
The project questions and challenges the relationship between humans and nature. It’s the Canadian conundrum; the fine balance of peoples’ continuous struggles with the beauty, and the power of the environment. Students will respond to the works of Andy Goldsworthy, and Christo & Jean-Claude, and various other installation artists. The exhibition will be on-going for two weeks; nature may prevail and destroy the works; this harsh reality becomes part of the experience. Once the exhibition ends, there will be no evidence of its existence.
Materials & Construction Consider the following materials: fabric, photographs, paper, wood, rope, string, plastics, and metals. Bring all materials to create the installation and remove them when the exhibition is over. Students will not be permitted to alter or destroy anything on the school grounds.
Project Outline
Students are required to create a detailed plan in which they outline a proposal for an art installation in the school grounds. The installation will be in response to the environment and the chosen display area. When planning, consider renowned environmental installation artists: Andy Goldsworthy and Christo & Jean-Claude. Parents and friends are encouraged to participate.
Evaluation
The students will be marked on creativity, originality, successful implementation of their plan. The students’ artwork will express a clear message relating to the theme “Nature Verses”. The installation is respectful of the surrounding environment. The complete clean up of their installation area. Students will only receive a final grade when all evidence of the installation has been removed.

Monday, April 23, 2012

12 InfraRed Photography

WARNING several things to consider when shooting infrared:
  1. Keep infrared film cold.
  2. Load infrared film in complete darkness.
  3. Use a filter when shooting infrared film.
  4. Photograph in early or late day light, never at night, or mid-day.
  5. Choose landscapes, live things for your subject.
  6. Consider the sky- dramatic clouds look amazing.
  7. People look creepy- pale, eyes are black and veins are pronounced. 
In infrared photography, the film or image sensor used is sensitive to infrared light. The part of the spectrum used is referred to as near-infrared to distinguish it from far-infrared, which is the domain of thermal imaging. Wavelengths used for photography range from about 700 nanometre to about 900 nm. Film is usually sensitive to visible light too, so an infrared-passing filter is used; this lets infrared (IR) light pass through to the camera, but blocks all or most of the visible light spectrum (the filter thus looks black or deep red). ("Infrared filter" may refer either to such a filter or to one that blocks infrared but passes other wavelengths.)
When IR filters are used together with infrared-sensitive film or sensors, very interesting "in-camera effects" can be obtained; false-color or black-and-white images with a dreamlike or sometimes lurid effect mainly caused by foliage (such as tree leaves and grass) strongly reflecting in the same way visible light is reflected from snow. There is a small contribution from chlorophyll fluorescence, but this is marginal and is not the real cause of the brightness seen in infrared photographs
This is a BW Infrared project, but you are welcome to try digital infrared, but it seems that you need specialized/adapted camera equipment.
Here is an Infrared Photography site to check out: http://www.infraredphoto.eu/Site/GentleIntro1.html

Tuesday, April 3, 2012

12- Zone System Analysis

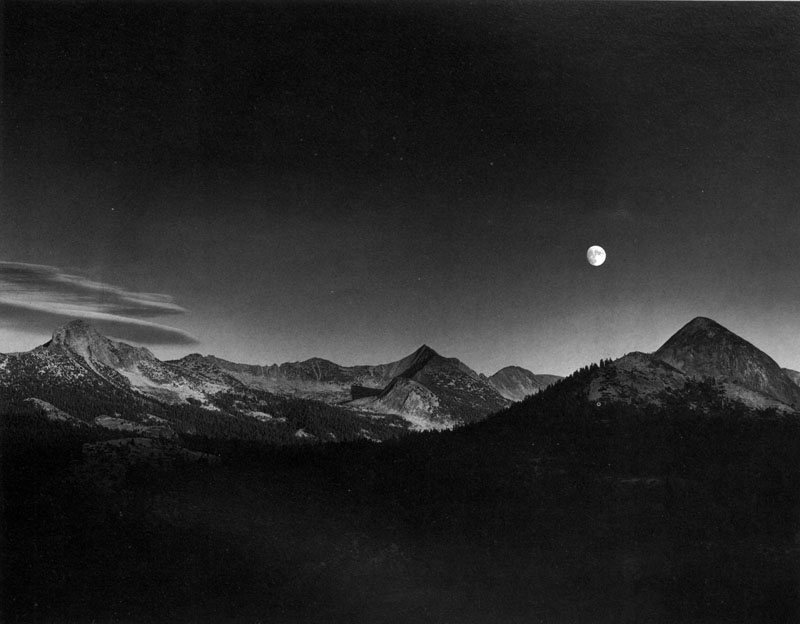
Choose one of the Ansel Adam's Landscape photos and identify the zones. You should have at least one of each of the zones: I, II, III, IV, V, VI, VII, VIII, IX, there likely will not be zones O or X. You can either save the image and indentify this in Photoshop, or on Word... Illustrator... then post to your Journal.


Monday, April 2, 2012

12 Zone System

Your camera’s metering modes are built to give you a correct reading under most average situations. But when you’re faced with an exceptional situation, your camera’s metering can easily be fooled, thinking a scene is brighter or darker than it actually is. This is where knowledge of the zone system can save you a lot of trouble, and help you capture not only correct but also intriguing exposures every time.

 
Although calculations for the zone system were originally based on black and white sheet film, the Zone System is also applicable to roll film, both black and white and color, negative and reversal, and even to digital photography.

 
The Zone System’s Key Concepts
The zone system divides a scene into 10 zones on the tonal scale (though there are variations of 9 and 11 zones). Every tonal range is assigned a zone. Every zone differs from the one before it by 1 stop, and from the one following it by 1 stop. So every zone change equals 1 stop difference. Zones are identified by roman numbers, with the middle tone (with 18% reflectance) being a zone V which is zone 5.
Photographers, usually are only concerned with zones III through VII (zones 3 through 7). The darkest part of a scene would fall into zone III, while the brightest part of a scene would fall into zone VII. Anything darker than zone III would render as pure black with no detail (under-exposed), while anything brighter than zone VII would render as pure white with no detail (over-exposed).
If you point your camera at an area with average reflectance and obtain the correct meter readings (a zero on the light meter), that area would be rendered as average. If you open up your lens or slow down your shutter speed by one stop, that area will become over-exposed by one stop. If you close down your lens or increase your shutter speed by one stop, that area will become under-exposed by one stop.
An average tone is naturally placed into zone V. If you over-expose it by one stop, you’ll be placing it in zone VI (zone 6), causing it to render brighter than it actually is. If you under-expose it by one stop, you’ll be placing it in zone IV (zone 4) causing it to render darker than it actually is.
--------------------------------------------------------------------------------

 
The Zone System is a photographic technique for determining optimal film exposure and development, formulated by Ansel Adams and Fred Archer in 1939–1940. The technique is based on the late 19th century sensitometry studies of Hurter and Driffield. The Zone System provides photographers with a systematic method of precisely defining the relationship between the way they visualize the photographic subject and the final results.


0-I-II-III-IV-V-VI-VII-VIII-IX

 
Zone Scale
0 Pure black

 
I Near black, with slight tonality but no texture

 
II Textured black; the darkest part of the image in which slight detail is recorded

 
III Average dark materials and low values showing adequate texture

 
IV Average dark foliage, dark stone, or landscape shadows

 
V Middle gray: clear north sky; dark skin, average weathered wood

 
VI Average Caucasian skin; light stone; shadows on snow in sunlit landscapes

 
VII Very light skin; shadows in snow with acute side lighting

 
VIII Lightest tone with texture: textured snow

 
IX Slight tone without texture; glaring snow

 
X Pure white: light sources and specular reflections

 
The relationship between the physical scene and the print is established by characteristics of the negative and the print. Exposure and development of the negative are usually determined so that a properly exposed negative will yield an acceptable print on a specific photographic paper.

The Assignment
  1. First- find an image by Ansel Adams an identify all of the zones.
  2. Then you are to go out with a grey card and a roll of Black & White Film and take portraits and landscape photos around the area.  Take an overall reading from your light meter in your camera and take that photo.
  3. Then point your camera at a middle grey card set your exposure to that setting and then take the photo of your scene. Note if there is a difference in exposure.
  4. Bracket your photos at least one up and one down for each photo.
  5. Print a contact sheet and one 5 x 7 evenly exposed and contrasted print.

Tuesday, February 7, 2012

11/12 Random Rolls

For many of you, this is a chance to catch up on Random Rolls. For others, this is a chance to get ahead. Here are a few suggestions of Random Rolls to try:
  1. Short depth of field and dead flowers (some of you still need to do your "APERTURE" Random Roll).
  2. New growth, shapes and textures
  3. Slow shutter
  4. Portraits and landscapes long depth of field.
  5. Make ugly look beauitful
  6. Ant's eye view
  7. Explore colours, shapes and lines of the new tennis court.
  8. Colour Balance- Remember this one? Some have forgot to do it...
  9. Take a whole random roll on "M" make adjustments to imporve.
Take a random roll of 20 or more photos and then print out a contact sheet and hand it in by the end of the day. This is your attendance and assignment for the day. Be creative and have fun...

Monday, February 6, 2012

Random Rolls

Hi Folks, while I am home sick, I want you to take advantage of this beautiful day and take some photos. Make sure you take 20+ photos and print a contact sheet by the end of class and hand it in by the end of class.


Option #1
Sunny Day Photos, a few things to try: shoot into the light, look for shadows, try over exposing a little, add a fill flash to a portrait, play with white balance, experiment with depth of field, and horizon line...


Option #2
Grade 12s start your Abstract Self-Portrait project with a random roll today go out with a camera and photograph objects, your challenge is to make simple everyday items look interesting.
Grade 11s work to develop your Book project ideas both with examples from the internet post to your journal and with a random roll.

Thursday, February 2, 2012

Abstract Self-Portrait/Studio Still-Life

This is a 2 part project. First we are going to learn about lighting objects in the studio. Then you are going to use the different lighting effects to creatively and stylistically light objects that represent something about you.

Studio Still Life
You are to create three studio still life compositions using metal, glass and textured objects. Compose a series of photos for each object; include backgrounds, a table and covering, and use one or two lights. Here is the Still Life Project Criteria


Abstract Self-Portrait
Create 5 interesting, creative, and eye catching images that represent something about you. This is sort of a photo essay of yourself except the images are going to be abstract photographs of objects that represent aspects about you. When you abstract things photographically, you don’t have to make it completely unrecognizable; though you should choose an attribute of that object and really explore it through the lens. Your compositions challenge the viewer to notice basic essence of objects.

Look for elements of design (shape and colour) and use the principles of design to help you compose the items that you choose to represent you.
Abstract Self-Portrait Criteria